Hosting a Static Website in AWS
This series of posts will follow the same structure to make it easier in the future to reference them.
Application Title
Victor's Cloud Notes. A static site deployed to AWS
Application Description
The first application I built in the cloud is this blog. It is a static website generated with Nuxt 3 and Content v2, with a little bit of TailwindCSS for styling. The application itself is pretty simple, but it will serve as a record of what I'm learning and as the first application I deploy to AWS.
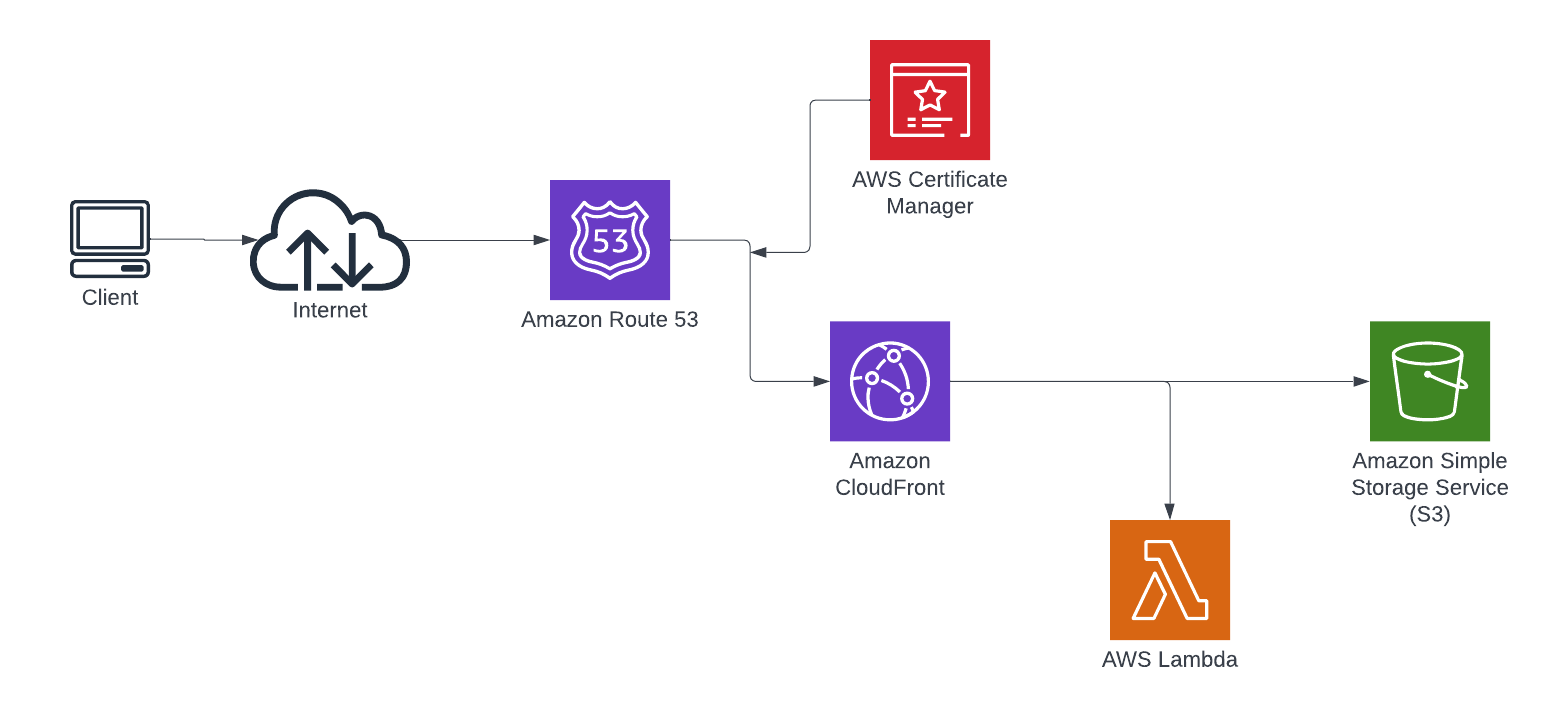
The static content will live in a S3 bucket. The distribution will be the responsibility of a CloudFront distribution. There is also some interactions with Amazon Route 53 for the CDNs, and even some AWS Lambdas.
Architecture Diagram
Services Used
Here is a little overview of the services used to build this application. Keep in mind that the definitions are my own. I wouldn't take them as a serious study material. They are just the way I currently understand the services and what does they do.
Amazon S3
A storage service. This is the oldest service provided by Amazon. It allow you to store your data on the cloud. The service includes a function to open your content as a static web site. This provides you with a cheap option if you want to host your site. However unless there is something specific you need AWS for, there are free options out there that may be a better option for most of your projects.
Amazon CloudFront
This is Amazon's content delivery network (CDN) service. It will enable you to have a cached version of your site closer to your users.
Amazon Route 53
Amazon's DNS service. This service will help you to route your users to the correct website or application. The service offers you the possibility of register new domains or you can use your existing domains.
Amazon Certificate Manager (ACM)
A service to provision, store, manage and update your SSL/TSL certificates.
Amazon Lambda Functions
A serverless compute offering that allows you to run your code without provisioning or managing any server.
Building Steps
Now this is where thinks are interesting. How do you host a static web site in AWS? and why do you needed Lambda?
Assuming you already have your application. The following summarize the steps you typically need to follow in order to publish it through AWS:
- Create a new S3 bucket.
- Upload your site files to your new bucket
- Set up the correct permissions in your bucket
- Create a new distribution in CloudFront
- Configure your routes with Amazon Route 53
The order if I were to do it again, is as follow:
1. Configure Route 53 as your CDN for your domain
I already owned this domain (I bough it from a different provider) so I only needed to delegate to Route 53 the DNS service.
1.1 Create a hosted zone in Route 53
- Login into your AWS account and go to Route 53
- Select
Hosted zonesin the lateral menu - Click the
Create hosted zonebutton in the main area - Fill the form with your
Domain name, and selectPublic hosted zoneas the type. Optionally input a description and the tags you want. - Click the
Create hosted zonebutton
Now you need to use the values in the NS record to update the DNS servers in the provider you have your domain. The steps are dependent on your specific register so I'm not going to provide any. Once you have done it, you need to wait until they are reflected. It can take some minutes or a couple of hours.
1.2 Create a SSL/TLS certificate for our domain
- Login into your AWS account and go to Certificate Manager
- Select
Request certificatein the lateral menu - Choose the
Request a public certificateoption - Click the
Nextbutton at the bottom of the form - Type your domain name in
Fully qualified domain name. You can add multiple names if you want for your subdomains, or use an'*'as a wildcard to protect multiple subdomains. For examplemysite.comand*.mysite.comwill protect all your subdomains formysite.com - Choose
DNS validationoption in theSelect validation methodsection - Click the
Requestbutton at the end of the form - You will get redirected to the
List certificatespage. A new notification will apear at the top of the page. - Click the
View certificatebutton in the top notification. - Once in the certificate page, click the
Create records in Route 53button in theDomainsregion - In the new page, check that everything is ok and click the
Create recordsbutton
Now you just need to wait until the certificate validation process is finished.
2. Create an S3 bucket to host your site
While you are waiting for the DNS to replicate your changes you can start creating an S3 bucket and uploading your website.
2.1 Create the S3 Bucket
- Login into your AWS account and go to S3
- Select the
Bucketsoption in the lateral menu - Click the
Create bucketbutton in the main area - Fill the
Bucket nameandAWS Regionin the form. For the rest of the options, you can keep the default values. - Click the
Create bucketbutton at the bottom of the page
With the bucket created, it's time to upload your files.
2.2 Upload your site's files
- Login into your AWS account and go to S3
- Select the
Bucketsoption in the lateral menu - Click your bucket's name in the table in the main area
- Click the
Uploadbutton - Drag and drop your files and folders or click the
Add filesorAdd folderbuttons to select the files/folders you want to upload - Review and validate that the files are correct in the table
- Click the
Uploadbutton once you are satisfied - In the status view, click the
Closebutton to return to the bucket's view.
Optional. Check your site is working correctly
Enable website hosting
- Login into your AWS account and go to S3
- Select the
Bucketsoption in the lateral menu - Click your bucket's name in the table in the main area
- Click
Propertiesin the tab options - Scroll down until you reach the
Static website hostingsection and click itsEditedit button - Select
Enablein the form - On the new options, select
Host a static website - Type the name of your
Index document. The rest of the options can be left in blank - Click
Save changes
Before you can view your site you need to grant public access to it.
Grant public access
- Login into your AWS account and go to S3
- Select the
Bucketsoption in the lateral menu - Click your bucket's name in the table in the main area
- Click
Permissionsin the tab options - In the
Block public accesssection clickEditbutton - Uncheck
Block all public access - Click
Save changes - Confirm the change typing
confirmin the dialog's textbox and clicking theConfirmbutton - In the
Bucket policysection click theEditbutton - Copy-paste the following policy or type a new policy that grants read access to anonymous users. Make sure to replace with your bucket's name. And keep the
/*part at the end of the resource name
{
    "Version": "2012-10-17",
    "Statement": [
        {
            "Sid": "PublicRead",
            "Effect": "Allow",
            "Principal": "*",
            "Action": [
                "s3:GetObject",
                "s3:GetObjectVersion"
            ],
            "Resource": [
                "arn:aws:s3:::<your-S3-bucket-name>/*"
            ]
        }
    ]
}- Click
Save changes
Now go back to the Properties tab, and you can see in the Static website hosting section the URL where you can consult your new site.
If you don't want to keep this access open you need to reverse these steps.
3. Create a CloudFront distribution for your site
At this point, I have all the files my site uses in the cloud. But I still need to make it available and accessible for my users. The service I will use is Amazon CloudFront, as it will deliver content with low latency and high speed.
3.1 Create a CloudFront distribution
- Login into your AWS account and go to CloudFront
- Select the
Distributionsoption in the lateral menu - Click the
Create distributionbutton in the main area - In the
Originsection, choose theS3 bucketcreated in step 2.1 for theOrigin domain - Choose
Yes use OAIoption for the newS3 bucket accessquestion that will apear - Click
Create new OAIbutton and clickCreatein the dialog that apear. - Choose the
Yes, update the bucket policyoption in theBucket policyquestion - For the
Default cache behaviorsection, you can change theViewer protocol policyif you want to only supportHTTPSor to redirectHTTPtoHTTPS. Same for theAllowed HTTP methods. Select whatever you need here. - Finally, go to the last section,
Settings. Select the regions you want to have edge locations in thePrice class. - Click the
Add itembutton in theAlternate domain name (CNAME)question and write the domain you will use for your site. You should add all the alias you will use, for example:mysite.comandwww.mysite.com. Add a new item for each domain alias. - Choose the certificate we created in step 1.2 in the
Custom SSL certificatequestion. - Type the root object of your website in the
Default root object. Usually, it will be"index.html" - Click the
Create distributionbutton at the end of the form
At this point, your distribution is created. You need to wait until it is deployed. That process can take a couple of minutes. An important note is that every time you made a change to the distribution, it will need to re deploy and take several minutes again. Patience is needed when working with CloudFront as your changes will not always be immediately reflected.
Optional. Create a lambda function to change the origin request behavior
In some cases you will need to create a lambda function to change the request that CloudFront makes to your S3 bucket for files. Especially when you have a folder structure for your site. For example if you try to access mysite.com/some/path CloudFront will ask S3 for /some/path file: a file named path in the some directory. What we normally want in those cases is that CloudFront asks S3 for the file /some/path/index.html.
In that situation we need to modify the Origin request that CloudFront will do to S3. For that the option we have is create a lambda function that will be invoked on the Request origin event and will modify the petition.
Create a Lambda to transform the requests
- Login into your AWS account and go to Lambda
- Select the
Functionsoption in the lateral menu - Click the
Create functionbutton in the main area - Select
Author from scratchoption in the form - Input the
Function nameyou want to use for your lambda function - Select the
Runtimeyou want. - Click the
Create functionbutton at the end of the form - In the code editor, input a new function to make the modification to the request. You can use the code below if you selected
nodeas the runtime environment
exports.handler = async (event, context, callback) => { // Extract the request from the CloudFront event that is sent to Lambda@Edge var request = event.Records[0].cf.request; // Extract the URI from the request var olduri = request.uri; // Match any '/' that occurs at the end of a URI. Replace it with a default index var newuri = olduri.replace(/\/$/, "/index.html"); // Match any path not ending with a file extension. Add a default index if (!newuri.match(/\/.+\..+$/)) { newuri = newuri + "/index.html"; } // Replace the received URI with the URI that includes the index page request.uri = newuri; // Return to CloudFront return callback(null, request);};- Click the
Deploybutton to save your code as a Lambda function
Configure the lambda to be able to use in CloudFront
- Login into your AWS account and go to Lambda
- Select the
Functionsoption in the lateral menu - Click in your function name in the main area
- Go to the
Versionstab and click thePublish a new versionbutton. ClickPublishwhen the dialog appears. - If you are not redirected to the version page, click the last published version in the
Versionstab to go to the version page - Click in the
Permissionsoption in the lateral menu - Click in the Role name in the
Execution rolesection. You will be redirected to IAM service - In the page of the role, go to the
Trust relationshipstab - Click the
Edit trust policy - Add
"edgelambda.amazonaws.com"to the list of services, or copy the code below
{ "Version": "2012-10-17", "Statement": [ { "Effect": "Allow", "Principal": { "Service": ["edgelambda.amazonaws.com", "lambda.amazonaws.com"] }, "Action": "sts:AssumeRole" } ]}- Click
Update policyto save the changes
Trigger the Lambda
- Login into your AWS account and go to Lambda
- Select the
Functionsoption in the lateral menu - Click in your function name in the main area
- Go to the
Versionstab and click the version number you published - In the
Function overviewsection click theAdd triggerbutton - Select
CloudFrontin the select control. - In the
Distributionquestion, select the id of your CloudFront distribution - Select
Origin requestin theCloudFront eventquestion - Check the box
Confirm deploy to Lambda@Edge - Click the
Addbutton at the end
4. Serve your site using Route 53
The last thing we need to do, is redirect trafic from our domain to our CloudFront distribution
- Login into your AWS account and go to Route 53
- Select the
Hosted zonesoption in the lateral menu - Click in your domain name in the table in the main area
- In the new page, click the
Create recordbutton - In the
Record nametype the subdomain of your site or keep it empty if will use the root domain. For example, typewwwif you want to access your distribution going towww.mysite.com - In
Record typeselectA - Switch on the
Aliastoggle button - Select
Alias to CloudFront distributionin theRoute traffic toselect - In the search box, select the name of your distribution.
- If you want to enable IPv6, click the
Add another recordbutton and repeat from step 5 to step 8, but selectAAAAas theRecord type - Repeat steps 5 - 10 for each subdomain you want to use your distribution for.
If you completed all the steps in this guide, you now should be able to access your site from the domain configured
Learnings
This was an interesting project that took me more time than I estimated. I tried to do it without really knowing how everything worked in the AWS console and without real understanding of all the services. Some parts were really easy and intuitive, but others not so much. There was also the issue with the index file in the subfolder that I couldn't understand at the beginning and where I spend a lot of time figuring out what and why it was happening.
Creating the S3 bucket and uploading my files using the console was pretty easy. The user interface is really intuitive. Once I tried to enable it as a static website hosting things started to be less straightforward.
First of all, it is not enough to enable the hosting option. You need to turn off public access blocking in a different section. So far, not that hard. But you need to create the correct policy to enable public access, and that is not clear just by looking at the UI. You really need to understand how the S3 service works.
Next, there is CloudFront. The term Distribution was not clear for me. It didn't tell me much about what it was for. Knowing what the service was used for, and being it the main CTA in the service landing page I assumed that it was the right option.
After that initial struggle, the rest was easy. Selecting S3 as the origin, creating the correct policy, filling the domain information, deciding the protocols to support and the behavior, selecting the supported regions.
Something that was not clear is that you can use an S3 bucket as an origin in two ways. As the S3 API or as a website. The default is using the S3 API that introduce new challenges that are not clearly explained.
After a couple of days I found I needed to change the behavior of the origin request using a Lambda function. I don't really know all the options the event has, so I was not fully able to solve it for myself. Fortunately there are a couple of examples on how to modify the request origin request and I was able to create a function that works for my use case.
Another problem I run into with the lambda function is that you need to enable a special set of roles and permissions for it to work with CloudFront. I was confused by the terms roles as in AWS those have a different function than in other software systems I'm most used to. In AWS a role does not grant permissions for users, but for services.
Next steps
The next step is automate the deployment of new blog posts. With the current status, the only way to add a new entry is to create a new post in my local environment (the Nuxt application), and run the build command again. Once I have the new files, delete the previous ones in S3 and upload the new ones.
Instead of doing all of that, I want to set an automated pipeline so that every time I commit with a new post to my git repository all the steps I described are executed immediately and I have my blog site updated.